
So here's the thing – my new role officially expects me to create content now. Not just the occasional presentation or webinar, but actual video content. You know, the kind that people might actually want to watch instead of enduring because they have to.
(Side note #1: Have you seen Cory Minton's videos on LinkedIn - dude does all that in his home office by himself with some AI video editing assistance. I'm learning from a master.)
My old office setup? Sure, it worked fine for a Zoom call or throwing together a quick webinar where everyone's just happy if they can hear you clearly. But for produced video content that doesn't make viewers immediately click away? Yeah, that wasn't going to cut it.
Guess that means it was time to upgrade. And by "upgrade," I mean completely rebuild my entire setup from scratch because apparently, I'm one of those people now.
The Video Setup Journey
The Camera Hunt
I started by asking around the team, and one of my colleagues (Craig Robin) dropped some wisdom on me: "Unless you want to shell out for a proper professional video camera, you better look into overheating issues. I returned my Sony because it kept shutting off on me" Turns out, a lot of cameras just... give up after recording for a while. Who knew?
After way too much research (and probably too many YouTube videos), I landed on the Canon R6 Mark II. This thing is basically designed for people like me – folks who need something that can handle long recording sessions without throwing a digital tantrum.

The R6 Mark II runs about $2,000 now, which felt like a lot until I started looking at what actual professional video cameras cost. Suddenly, $2k seemed downright reasonable for something that can shoot 4K and won't overheat during my inevitably long-winded explanations of technical concepts.
(Side note #2, if you want to spend a bit more the R5c would probably be an even better choice. Or if you want to wait there's an R6 Mark III coming out soon. The important bit is making sure it doesn't overheat in normal conditions, and that you can get a clean HDMI out.)
Lens Learning Curve
Then came the lens situation. I had to learn about all this photography terminology that I'd somehow avoided my entire life (okay this isn't entirely true, but I did need a refresher). Bokeh – which, by the way, is pronounced "BOH-kay," not "BOH-keh" like I was saying for weeks – and f-stops became my new obsession.
Basically, the f-number (like f/1.8) tells you how wide the lens aperture can open. Lower numbers mean wider apertures, which means more light gets in, and you get that nice blurry background effect that makes you look professional instead of like you're recording in your spare bedroom (even though you totally are). Want to learn more? Canon has a pretty good post about it (https://www.canon-europe.com/pro/infobank/understanding-focal-length/).

I ended up getting both a 35mm f/1.8 ISM lens and a 50mm f/1.8 lens. The 35mm is great for when I want to show more of my setup or gesture wildly with my hands, and the 50mm gives me that nice portrait look for more serious talking-head content. Both were surprisingly affordable – the 50mm was around $300, and the 35mm was about $500.
The Teleprompter Rabbit Hole
Here's where things got interesting. Apparently, I also needed a teleprompter? I mean, I could just try to remember what I wanted to say, but let's be realistic here – I can barely remember where I put my coffee five minutes ago.
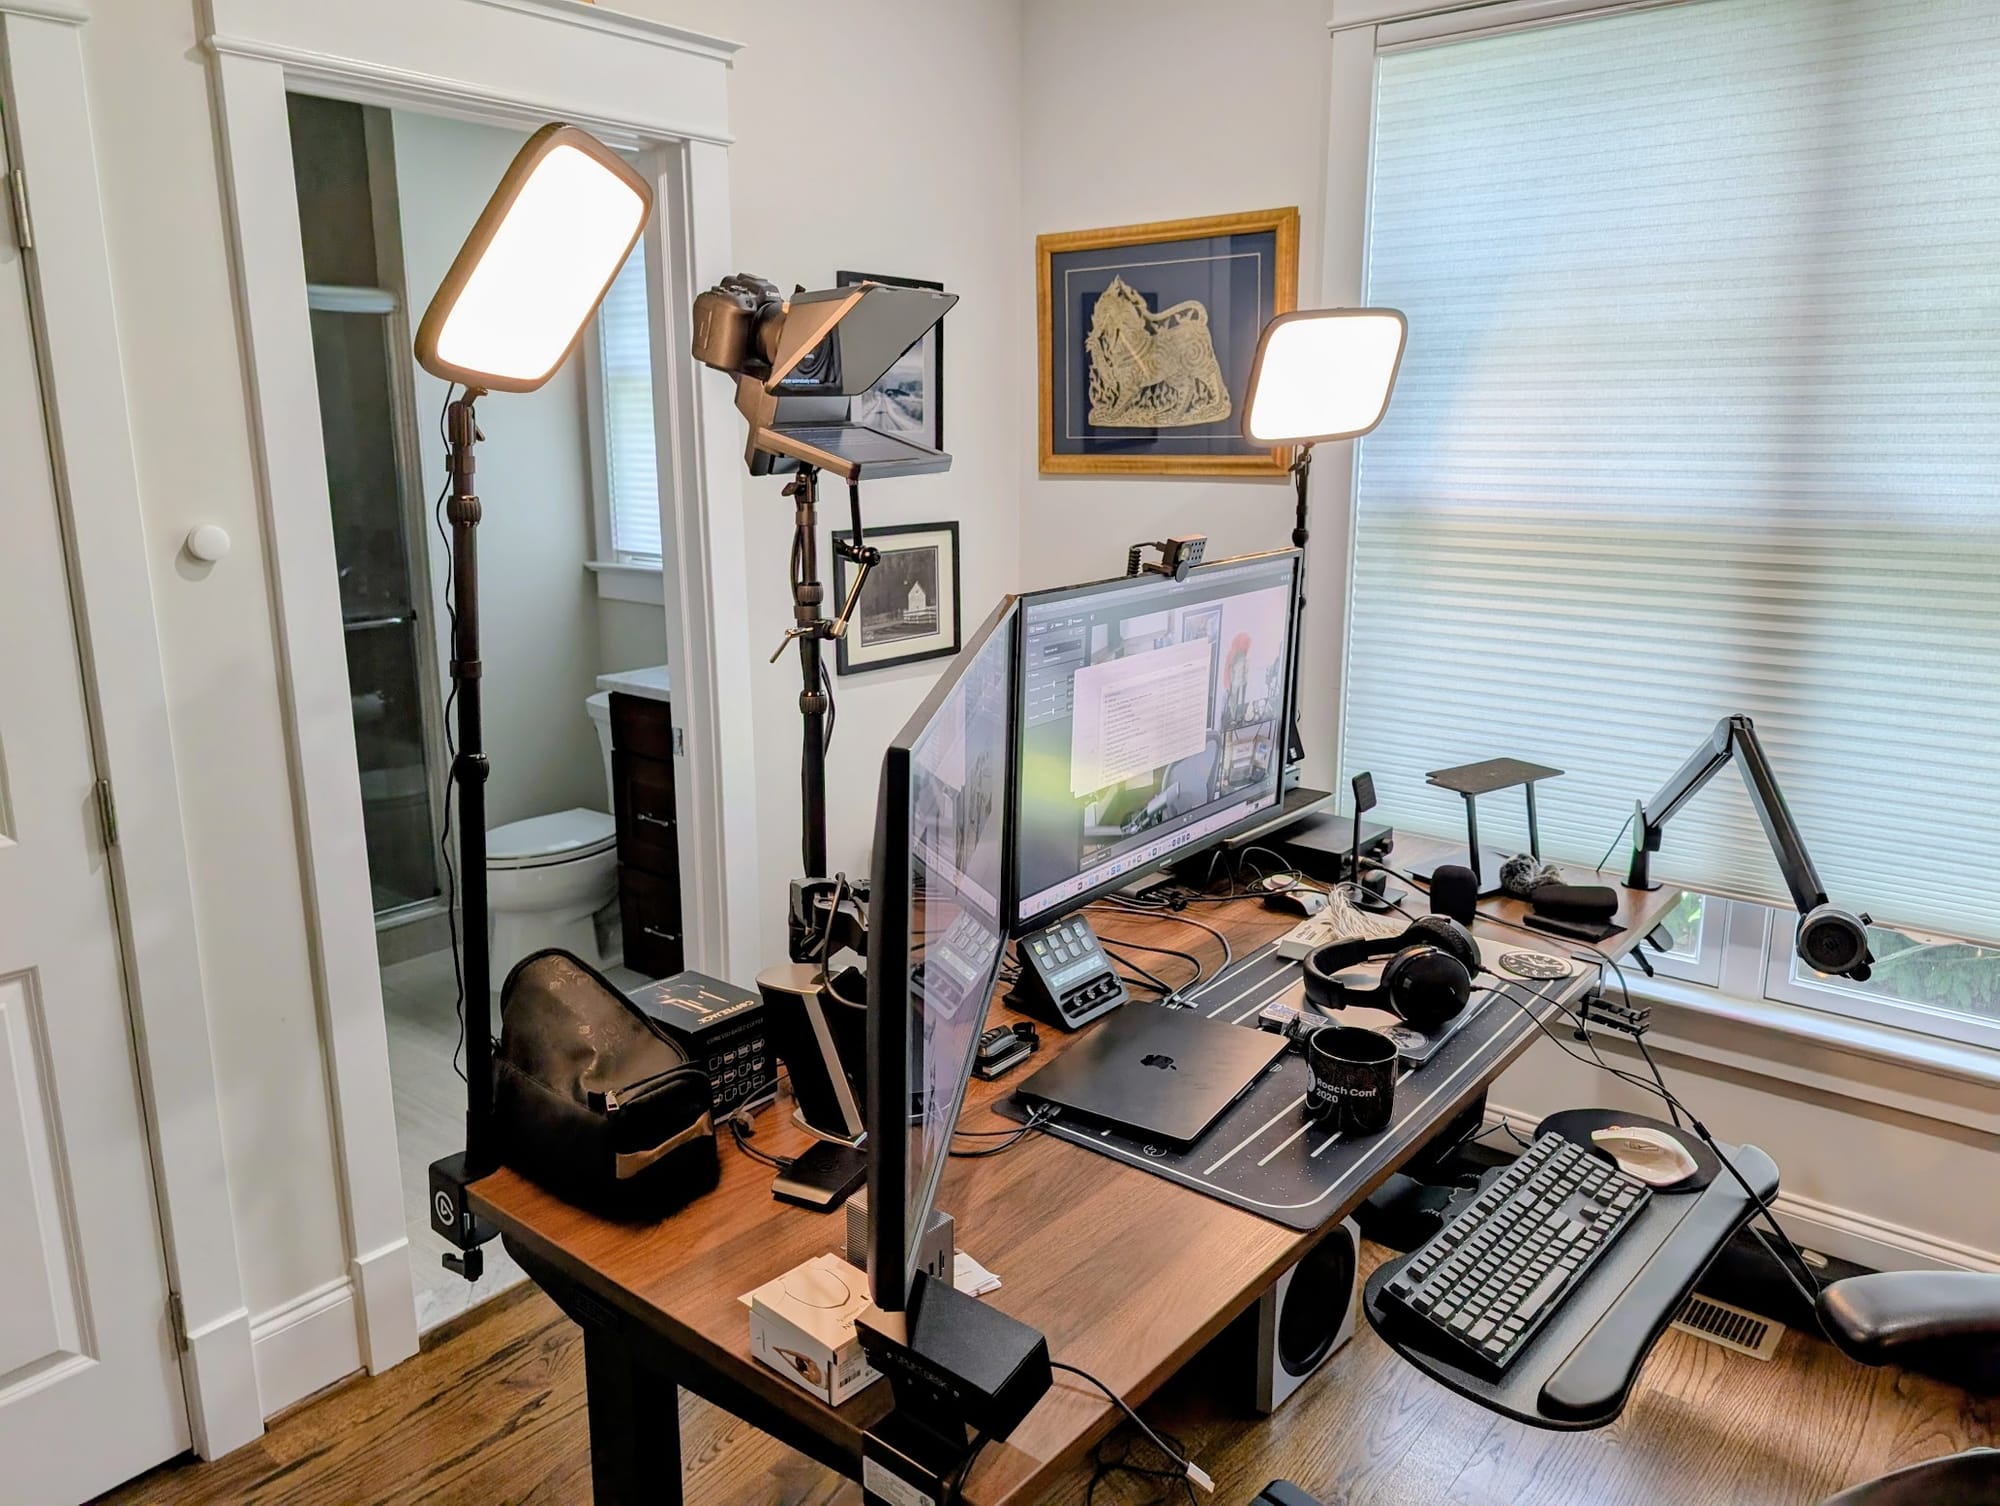
Elgato came to the rescue with their Prompter, which runs about $240 when it's on sale. It's not super expensive compared to traditional teleprompters, and lets you mount the camera inside the prompter so it looks like you’re looking at the camera! But here's the thing – now I needed to figure out how to sync my camera with my computer.
Enter the CamLink 4K, another $90 gadget that basically tricks your computer into thinking your fancy camera is just a really good webcam. Genius, right?
(Side note #3: recording in 4k was a must because I want to be able to crop down to a shorts format without making the video look fuzzy. My other option was to get a rotating mount but that just felt... well it felt like I was going overboard. Okay? That being said, I could have gone with a cheaper camera if I'd been willing to get the rotating mount because my finished video is all probably going to be in 1080p most of the time.)
But wait, there's more! (I feel like I'm in an infomercial at this point.) The camera was too far away from my computer to make this work properly, so I had to learn about custom mounting equipment. Ended up getting a 90-degree mounting kit that lets me position everything where it actually makes sense instead of having cables stretched across my office like some kind of technical obstacle course.
The Sync Problem
Of course, nothing in tech ever works perfectly the first time. When I finally got everything connected through the CamLink, my audio and video decided they didn't want to be friends anymore. There's nothing quite like watching yourself talk and realizing you look like a badly dubbed foreign film.
Audio Adventures
Now, for audio, I had two paths: go full professional with a Shure SM7B (the podcast standard) and an XLR to USB-C adapter with phantom power, or stick with a USB podcasting mic. The SM7B route would've added another $400+ to the budget, and honestly, I already had a decent USB mic setup that wasn't embarrassing. Also, since I was expensing all this gear to my employer, I needed to stay under that $5k limit or I was going to have to go get additional approvals.
But those sync issues were driving me nuts. Fortunately, Elgato has thought of everything – they have software solutions for people like me who've cobbled together a Frankenstein setup.
Their Wave Link software became my best friend. I could route the camera through Camera Link (for the video), connect the CamLink device, manage the teleprompter, and handle all my audio through Wave Link. Once I switched to using the virtual mic output from Wave Link instead of my direct mic connection, the sync issues just... disappeared. Like magic, but the kind of magic that comes from good software engineering.
Oh, and pro tip: you absolutely need headphones unless you want that weird echo effect where your mic picks up your speakers. I already had some good headphones, but honestly, any decent pair will work for monitoring. Maybe I'll do a follow-up post about DACs, linear amps, and high-end headphones, but that's a rabbit hole for another day.
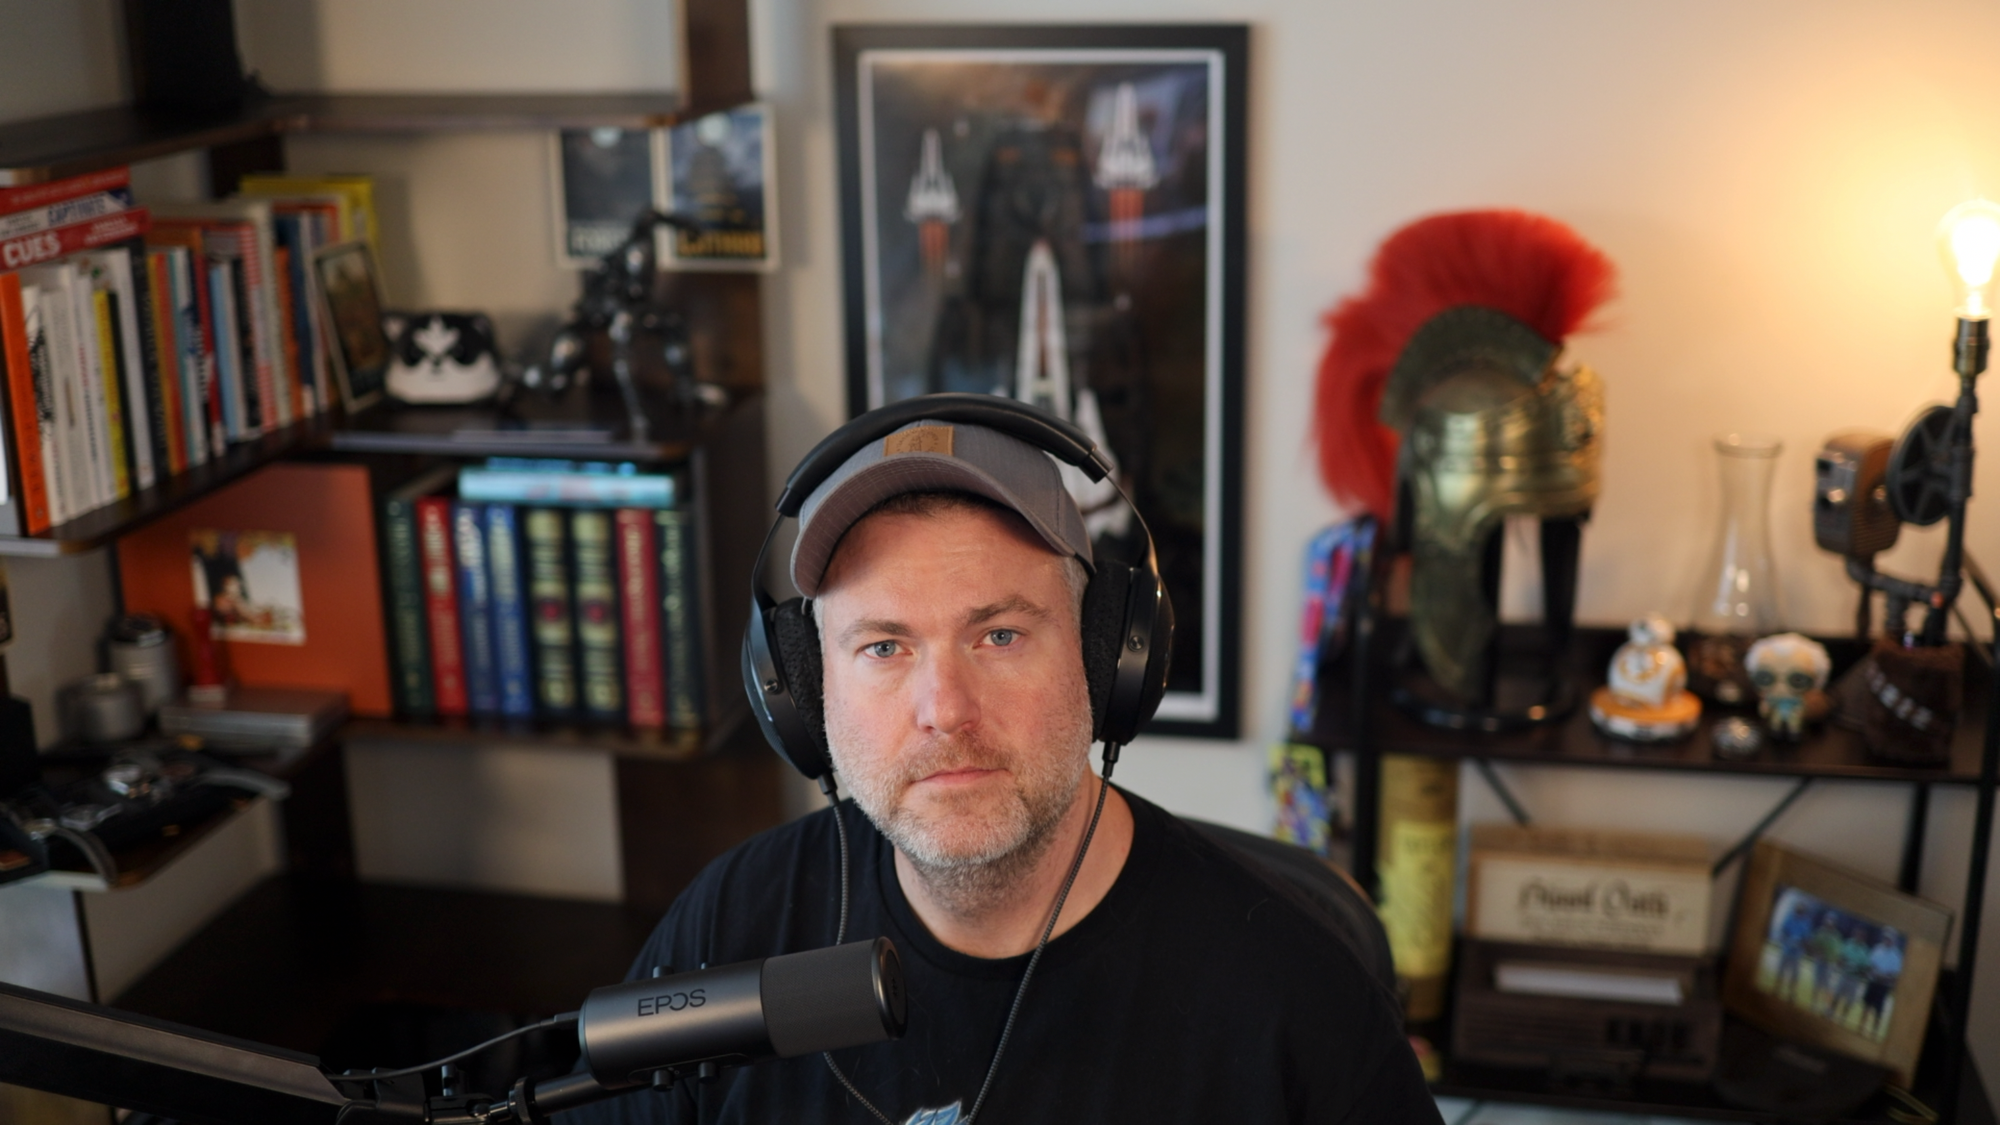
Lighting: The Zombie Problem
With my camera setup working, I discovered a new problem: I looked like a zombie. The overhead lights in my office are functional for work, but apparently "functional" and "flattering" are not the same thing. Who would have thought?
I tried some cheap ring lights first, thinking I could save a few bucks. Bad idea. They hurt my eyes, were a pain to position properly, and honestly made me look like I was being interrogated rather than creating content.

Back to Elgato I went (starting to see a pattern here?). Their Key Lights are these flat, adjustable LED panels that are actually designed for this kind of thing. I ended up with two of them, and the difference was night and day.
The key was finding the right color temperature – I went with a warmer tone that made me look less like death warmed over. I might need to get a third one for some up-lighting because I still have a few weird shadows, but the two-light setup is a massive improvement over my previous zombie aesthetic. Maybe I'll bring it back for my October recordings though.
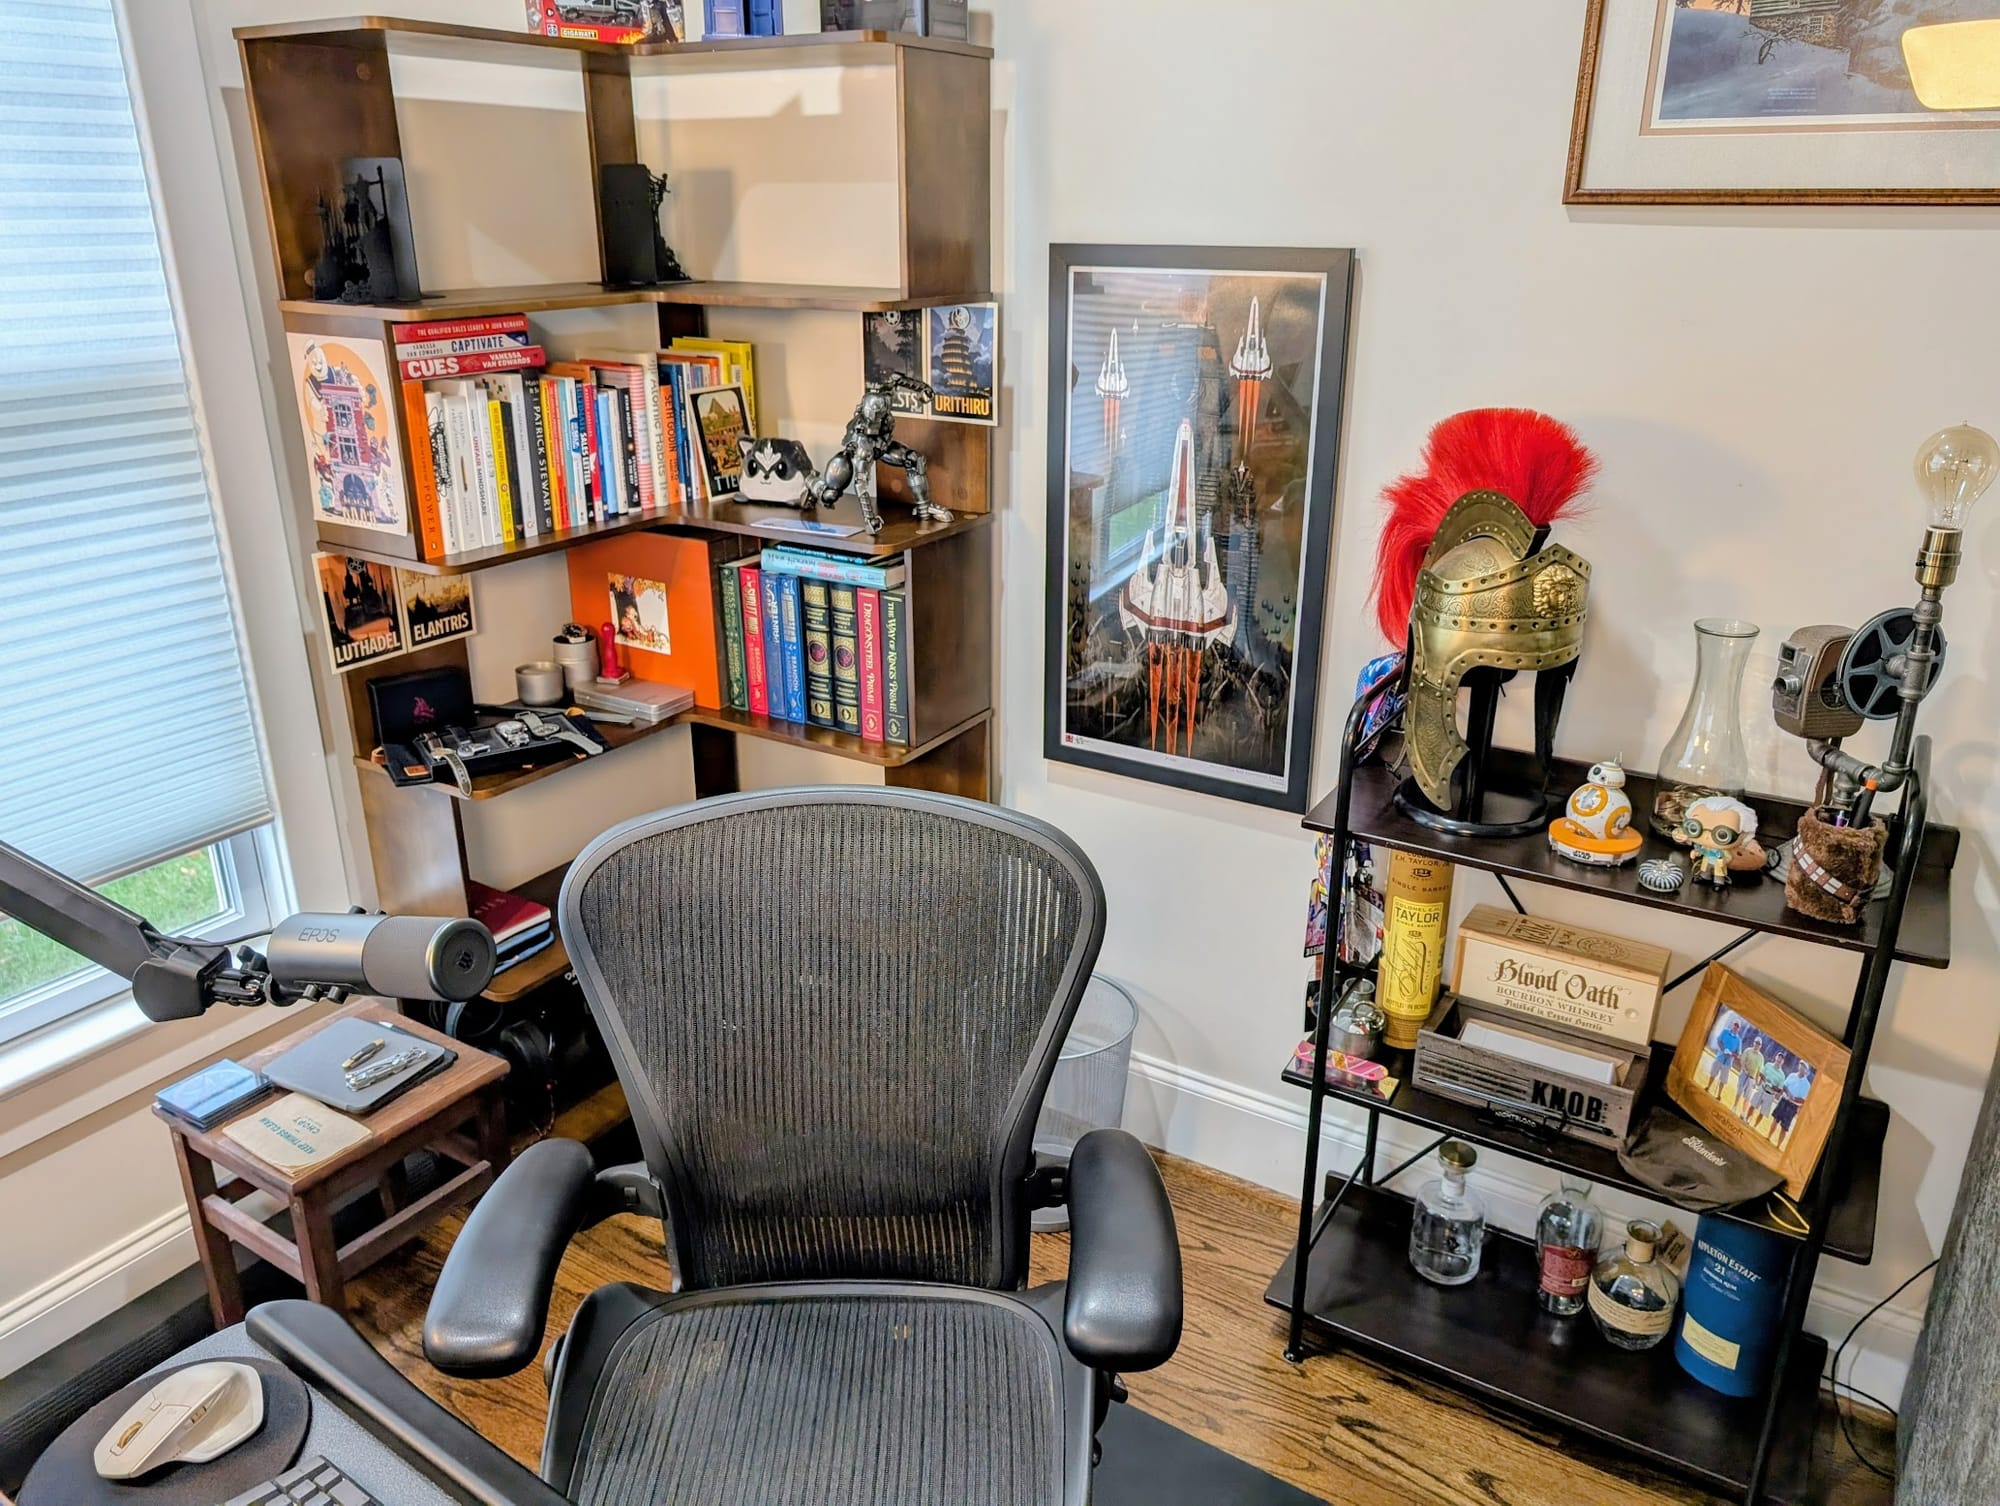
The Background Situation: My Office Looks Like Crap
Okay, so I had good lighting and I no longer looked like the undead. But there was still one glaring problem: my background looked like absolute garbage. And I'm not talking about the kind of charming, lived-in garbage that says "authentic work-from-home vibes." I'm talking about the kind that screams "this person has given up on life."
Here's the thing I learned the hard way: what's behind you absolutely matters, even when you've got that beautiful bokeh blur going on. You'd think that out-of-focus background wouldn't be noticeable, but trust me, it is. A messy, chaotic background will still read as messy and chaotic, even when it's artistically blurred.
So I had to completely reorient my entire office to make it conducive to recording. This meant moving my desk, rearranging furniture, and basically redesigning my workspace around what would look good on camera instead of what was convenient for actually working.
(Another side note...#4 I think: Megan was not happy with me because between blowing up my office and putting it back together again, I went on an out of town business trip. What I thought would be a 1 day project took me at least two whole weekends. Oops!)
The goal was to create something interesting but not distracting – I wanted the background to help me "pop" in the frame without taking attention away from whatever I was talking about. Think of it like the difference between a professional headshot and a driver's license photo. Same person, but one has clearly put thought into the staging.
This was honestly the toughest part of the whole project so far. I'm not naturally into styling or design – I'm the kind of person who thinks "functional" is a perfectly valid aesthetic choice. But after moving things around approximately seventeen times and taking way too many test shots, I think it turned out okay.
I ended up with a setup that has some visual interest without being busy: a bookshelf off to one side with some books and a few interesting doodads from around the house, and some wall art that adds color but doesn't compete for attention. The key was making sure there were some vertical and horizontal lines to create structure in the frame, but keeping everything clean and uncluttered.
The weird part is how much this changed the feel of my office. It's not just that it looks better on camera – it actually feels more professional and intentional when I'm working. Apparently, there's something to be said for putting thought into your environment, even if you're the only one who sees it most of the time.
Operations: The Control Problem
At this point, I had a problem: How the hell was I going to manage all this equipment? I had lights to turn on, camera settings to adjust, teleprompter to control, audio levels to monitor, and probably a dozen other things I was forgetting.
The Stream Deck Plus became my salvation. This thing is basically a customizable control panel with programmable buttons for everything. You can set up buttons to turn lights on and off, adjust settings, switch between different audio sources, control your teleprompter – basically anything you can think of.
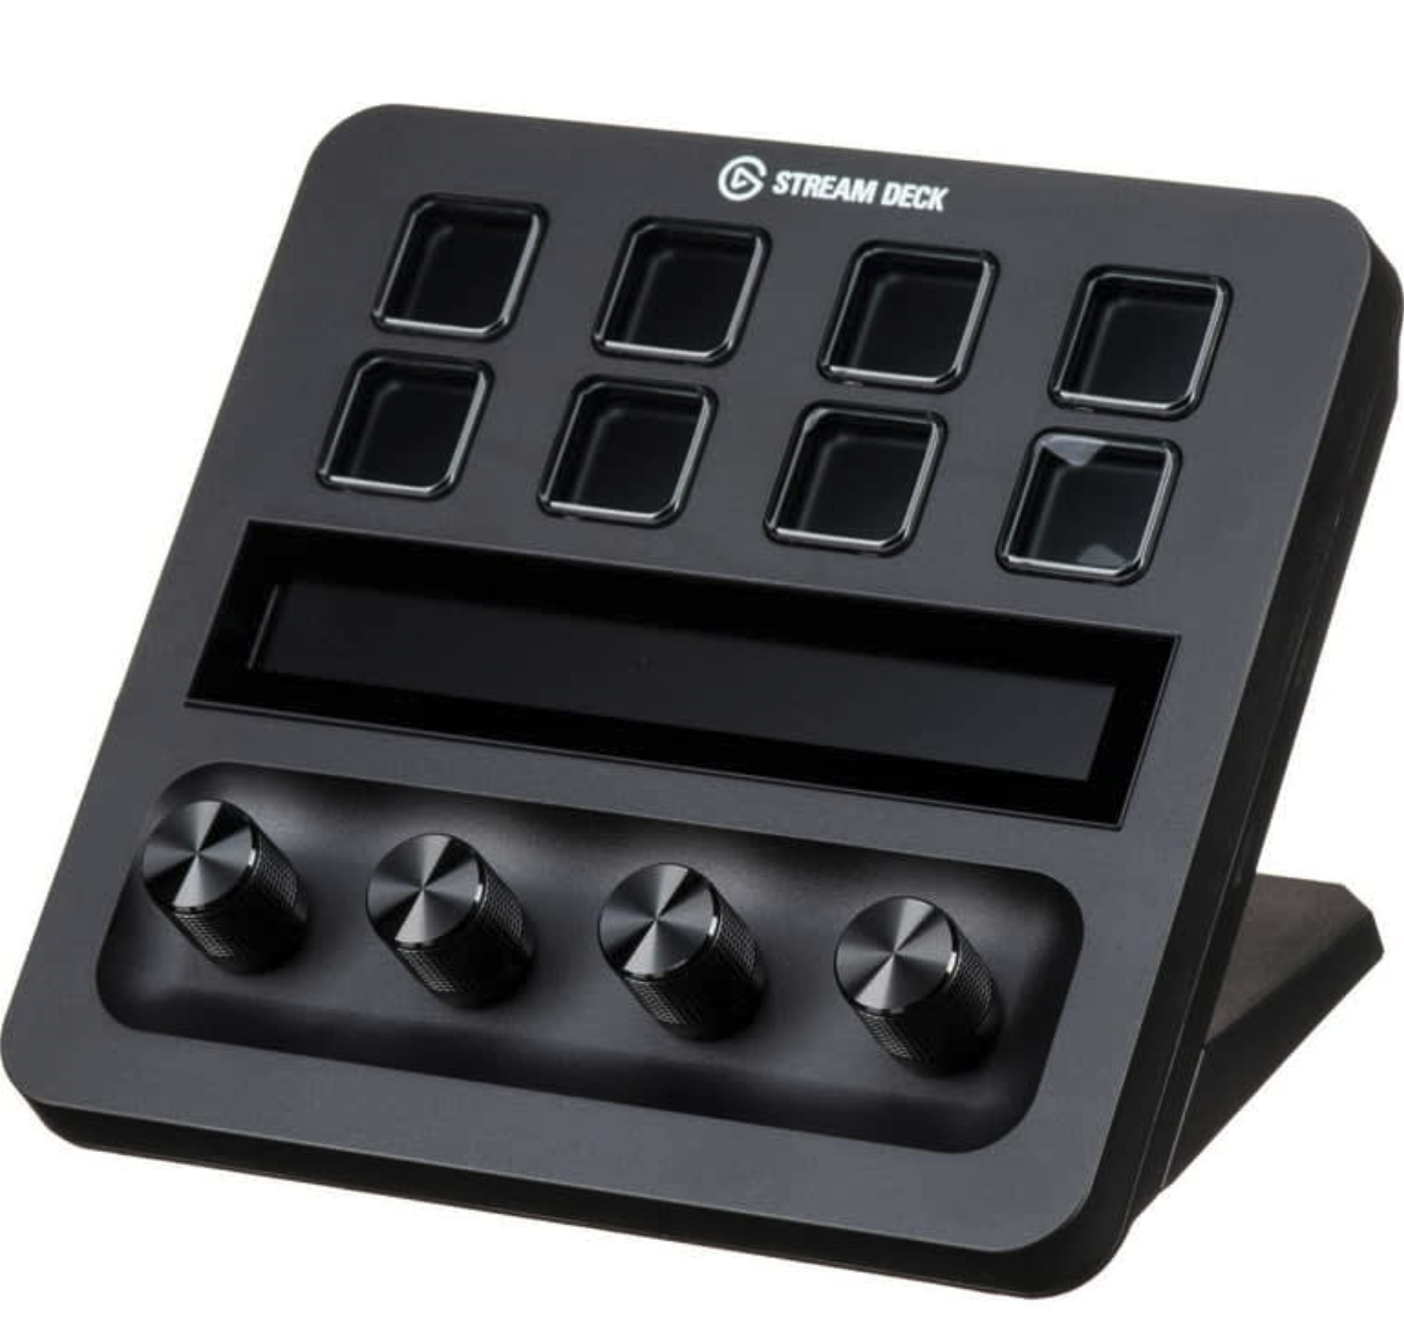
It's been a lifesaver. Now I can walk into my office, hit a few buttons, and everything turns on and gets configured properly. Well, almost everything – I still haven't figured out how to make it turn the Canon camera on and off automatically, so I have to remember to power it down at night. First world problems, right?
The USB-C Apocalypse
Here's something nobody warns you about: all this modern equipment uses USB-C, and you probably don't have enough ports on your computer. I certainly didn't.
I managed to make it work by connecting the Elgato USB Stream Deck hub to the Stream Deck (because of course it has USB passthrough – Elgato really did think of everything) and using a powered USB 3.1 hub I already had. But honestly, I really need a proper docking station at this point. Anyone have suggestions for a good one that won't break the bank and can handle all these power-hungry devices?
The Bottom Line
So what did this "million dollar" setup actually cost me? Let's break it down:
- Canon R6 Mark II: ~$2,000
- Canon RF 35mm f/1.8 lens: ~$500
- Canon RF 50mm f/1.8 lens: ~$300
- Elgato Teleprompter: ~$240
- CamLink 4K: ~$90
- Elgato Key Lights (2): ~$300
- Stream Deck Plus: ~$170
- Various cables, mounts, and accessories: ~$400
Total: Just around $4000, well under my $5k budget and giving me room for future upgrades or that third light I was talking about.
What's Next?
After my 4th of July break, I'm planning to record and post my first video. I figure I need some practice before I start doing work-related content that actually matters.
So here's where I could use some help: Any suggestions on what topic I should tackle first? I’d like to keep it to a topic I already know, so ideally it’ll be about bbq, bourbon, video games, or I guess data management if I need to make it work related.
And while we're at it, any software recommendations for making video editing easier? I've got the recording part figured out, but turning raw footage into something people actually want to watch is still a mystery to me.
The whole experience has been a journey, but I'm pretty excited about the possibilities. There's something satisfying about having a setup that works well and looks professional, even if I'm still figuring out what to do with it all.
Now if you'll excuse me, I need to go practice not looking completely awkward on camera. Apparently, that's harder than it sounds.


